Basic Configuration
1. Overview
This document provides an outline for configuring the Centrify 360 solution for Microsoft Dynamics 365 Business Central. The configuration process assumes that the installation step in Installation was successful
2. Configuration Steps
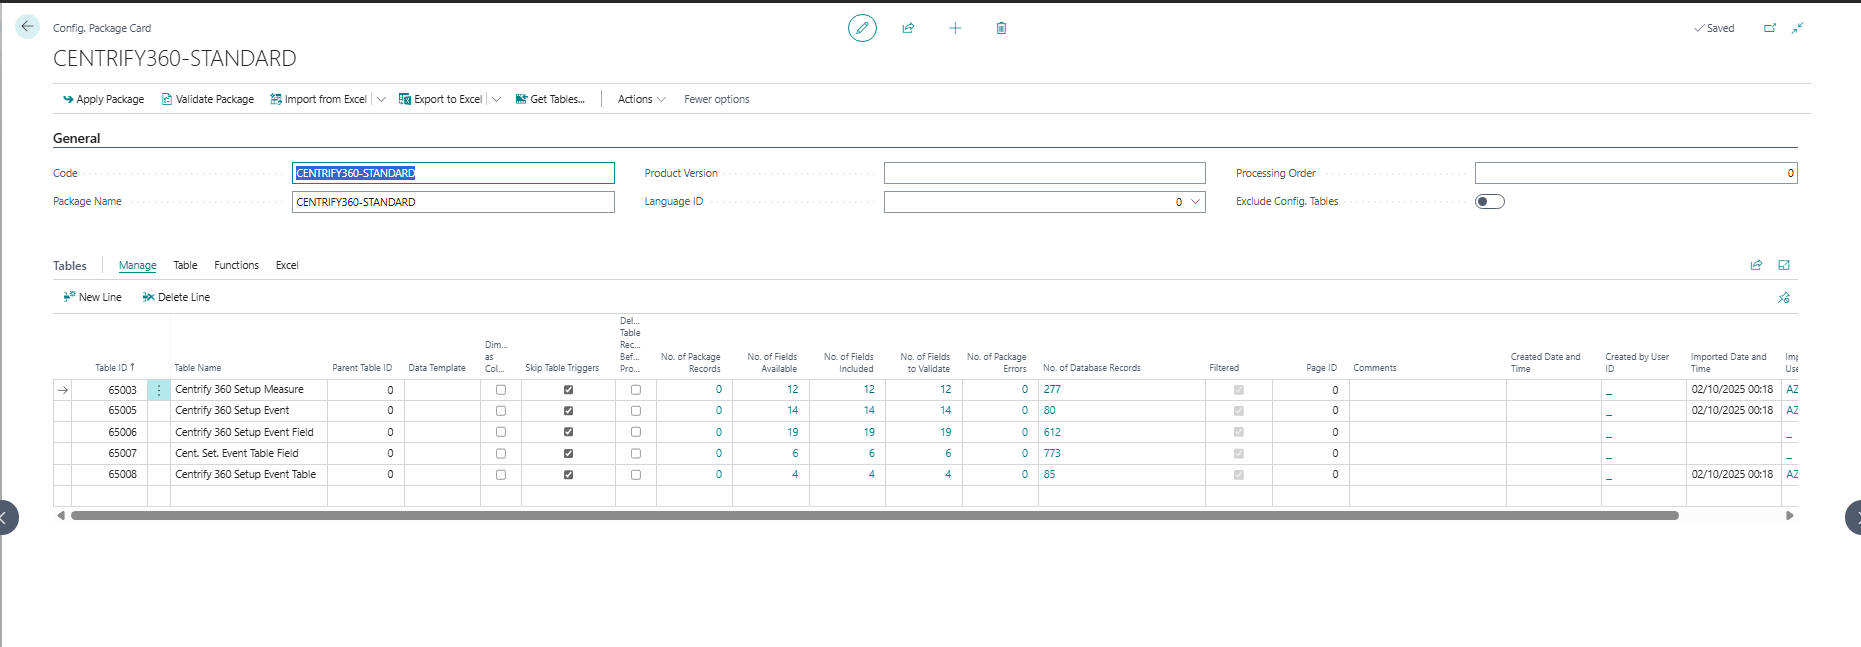
2.1. Step 1: Load Configuration Package
-
Navigate to business central Configuration Packages page.
-
Click on import from excel

-
Choose the Standard Configuration.xlsx file version that fits your BC installation (on-premises, SaaS).
-
Open the configuration package imported CENTRIFY360-STANDARD
-
Press on Apply Package
-
If there was any error when Apply Package is pressed, press it again until the remaining records are inserted
-
Repeat the above process for each additional module (Retail, Fixed Assets, …) if needed.
2.2. Step 2: Global Configuration
-
Navigate to Centrify 360 Setup page

-
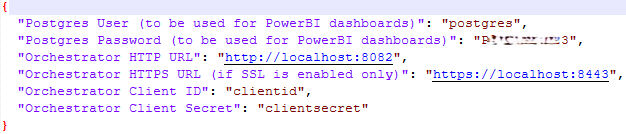
Open you installation-output.json file in the installation path choosen in the installation step before
-
Fill the required details in Centrify 360 Setup based on the below documentation:
-
Orchestrator URL:
-
If your installation was done on the same server as your BC instance (on-premises only), input the URL based on the choosen mode (HTTPS if HTTPS was configured, HTTP if not).
-
If not, input http://ServerIP:HTTPPort or https://ServerIP:HTTPSPort based on your setup, The selected ports should have inbound connections allowed on the server.
-
-
Orchestrator Client ID & Secret: Input as shown in installation-output.json
-
Date Table Start: The first date where you had any transaction in BC accross all companies
-
Date Table Buffer: Choose a buffer (in months) that should be maintained above each run’s date, to cater for date tables with future data (Due Date, Shipment Date, …)
-
Events Max Size: This is the maximum number of events sent in a single HTTP request, set to 5000 for best performance
-
Analysis Currencies: This is a comma separate list of analysis currencies needed later on in Power BI, Choose all your companies LCY currencies, plus any additional currency you would like to view your data by.
-
Power BI Mode: This is the mode the power bi model will be loaded in, Choose Import Mode for best performance. Refer to https://learn.microsoft.com/en-us/power-bi/connect-data/desktop-directquery-about for more details.
-
Deployment Server Host: This is your public IP of the server for connections to the star schema model in postgres.
-
If you plan to open Power BI reports on a different machine than the deployment server, set this to the public IP of the server. In this case the postgres default port 5432 should allow inbound connections.
-
If you plan to publish to Power BI Online, you can set this to localhost and use a Data Gateway.
-
-
Number of Parallel Events: Data will be sent from business central in parallel and this is the number of workers to be used. Choose the maximum number of job queue entries (10) for optimal performance.
-
Event Refresh Override Period: This is the period in minutes, for which data is sent even if they were already sent. This should only be set to a non-zero value for Retail installations with SQL Replication.
-
-
Refer to Dimensions for Business Central Dimensions setup
-
Refer to Object/Row Level Security for defining security roles on your data.
-
Once all fields are set, click on Test Connection, this should output a Connection Established Successfully message
-
Click on Deploy Configuration, this will deploy your configuration to the orchestrator, clear the target data completely, and download the model.bim file which will be used later to be able to visualize your data in Power BI.
|
Any later change to the configuration, whether customizations or dimension setup, requires a redeploy of the configuration. |
|
If HTTP usage is selected, you need to Enable HTTP Requests in Extension Management page for the Centrify 360 Extension in business central |
2.3. Step 3: Company Configuration
|
The below steps should be completed for each company |
-
Navigate to Centrify 360 Company page
-
Click on Enable Changelog for each company which will allow incremental changes to be sent.
-
Refer to Dimensions for Business Central Company Dimensions setup
|
The enable changelog step is crucial for data correctness and shall not be skipped. |
2.4. Step 3: Data Sourcing Job
|
The below steps should be completed for each company |
-
Navigate to Job Queue Entries page
-
Add a new job, to run the data sourcing Codeunit
-
The codeunit ID is 65000 for SaaS deployments
-
The codeunit ID is 41010 for on-premises deployments
-
-
Set the schedule of the job to run, each run will send only incremental changes (Delta). Refer to https://learn.microsoft.com/en-us/dynamics365/business-central/admin-job-queues-schedule-tasks for more information regarding job queue.
-
Run your job once and ensure that the status is successfull.
|
If any incremental job fails later on for any reason, the system is designed in a way to be fail-safe and the next successful incremental run will ensure data accuracy |
2.5. Step 4: Power BI Setup
-
Make sure power bi is installed and ready
-
Extract the PowerBI.zip file
-
Navigate to PowerBI/SemanticModel/Model
-
Copy the generated model.bim file (in Step 2 above) here and make sure its name is model.bim
-
You can now open any report, refresh your model, and visualize your data.
-
Refer to Publish to Power BI Online for steps on how to publish these reports to Power BI online.