Managed SaaS Installation (Azure Marketplace)
- 1. Overview
- 2. Prerequisites
- 3. Required Artifacts
- 4. Deployment Steps
- 4.1. Step 1: Install Business Central Extension
- 4.2. Step 2: Fetch Companies' Fingerprints & Get a License
- 4.3. Step 3: Deploy Centrify 360 Managed Application from Azure Marketplace
- 4.4. Step 4: Add the AI Redirect URI to the App Registration
- 4.5. Step 5: Retrieve Orchestrator Endpoint and Connection Details
- 5. Notes and Recommendations
- 6. Next Steps
1. Overview
This guide describes how to deploy Centrify 360 as a Managed SaaS solution using the Azure Marketplace managed application for Microsoft Dynamics 365 Business Central.
In this mode:
-
The ETL orchestrator, PostgreSQL analytics database, file storage, and monitoring are deployed automatically as an Azure Managed Application into your Azure subscription.
-
Data is pushed from the Centrify 360 Business Central connector to the managed application, where it is transformed and stored in an analytics-ready schema.
-
Centrify 360 maintains the managed application, while you retain full control over your Azure subscription, resource group, and data residency.
If you prefer to install the orchestrator and database on your own servers, see On-Premise Installation.
|
The plan price shown on Azure Marketplace does not cover the underlying Azure infrastructure costs (compute, storage, networking, database, etc.). They are billed directly by Microsoft to your Azure subscription, according to standard Azure pricing for the resources deployed. Check Pricing for more info. |
2. Prerequisites
2.1. System & Platform Requirements
-
Azure Subscription with permission to deploy marketplace offers and create resource groups.
-
Microsoft Dynamics 365 Business Central: Active subscription (SaaS or on-premises version 19 (2021 Release Wave 2) or later).
-
Power BI: Desktop version (free) or Pro/Premium for sharing reports.
2.2. Accounts and Permissions
-
Azure Permissions:
-
Owner or Contributor on the target subscription and resource group where the managed application will be deployed.
-
-
Business Central Admin Access:
-
To install and configure the Centrify 360 extension and data export jobs.
-
-
Power BI Account (optional):
-
For publishing and sharing Centrify 360 reports.
-
-
Power BI App Registration:
-
Mandatory when deploying the AI assistant.
-
Optional if AI is not enabled and you do not plan to use Integrated Publish & Update.
-
Required if you want Centrify 360 to publish or update reports automatically in Power BI Online.
-
For the Azure App Registration and service principal setup, see Power BI App Registration.
3. Required Artifacts
You will need the following before or during installation:
-
Centrify 360 Azure Marketplace Offer:
-
The Centrify 360 managed application listing in Azure Marketplace (Centrify 360 ETL for Dynamics 365 Business Central)
-
-
Business Central Extension:
-
The Centrify 360 extension (.app) for Business Central.
-
-
License Key:
-
A Centrify 360 license key (or license file) issued by the Centrify 360 team for your Business Central companies.
-
-
Power BI Reports (optional but recommended):
-
Power BI .zip file with Centrify 360 standard reports.
-
Contact the Centrify 360 team or visit https://centrify360.com for marketplace offer details, downloads, and licensing information.
|
If you plan to enable the AI assistant, a separate Centrify 360 AI add-on license is required. |
For AI architecture, model guidance, and cost planning, also refer to:
4. Deployment Steps
4.1. Step 1: Install Business Central Extension
To install the Centrify 360 Connector app, you will first need to add our module to your Business Central license:
-
Contact your Business Central implementation partner and ask them to provide us their 'Reseller PartnerSource Business Center Account Number'.
-
We will then add your partner as our Authorised Reseller.
-
Once your partner has been added as our Authorised Reseller, they can update your Business Central license and add our module, which is called '73446575 Centrify 360 Connector'.
This step can be completed by following the official Microsoft guide for publishing extensions:
https://learn.microsoft.com/en-us/dynamics365/business-central/dev-itpro/developer/devenv-how-publish-and-install-an-extension-v2
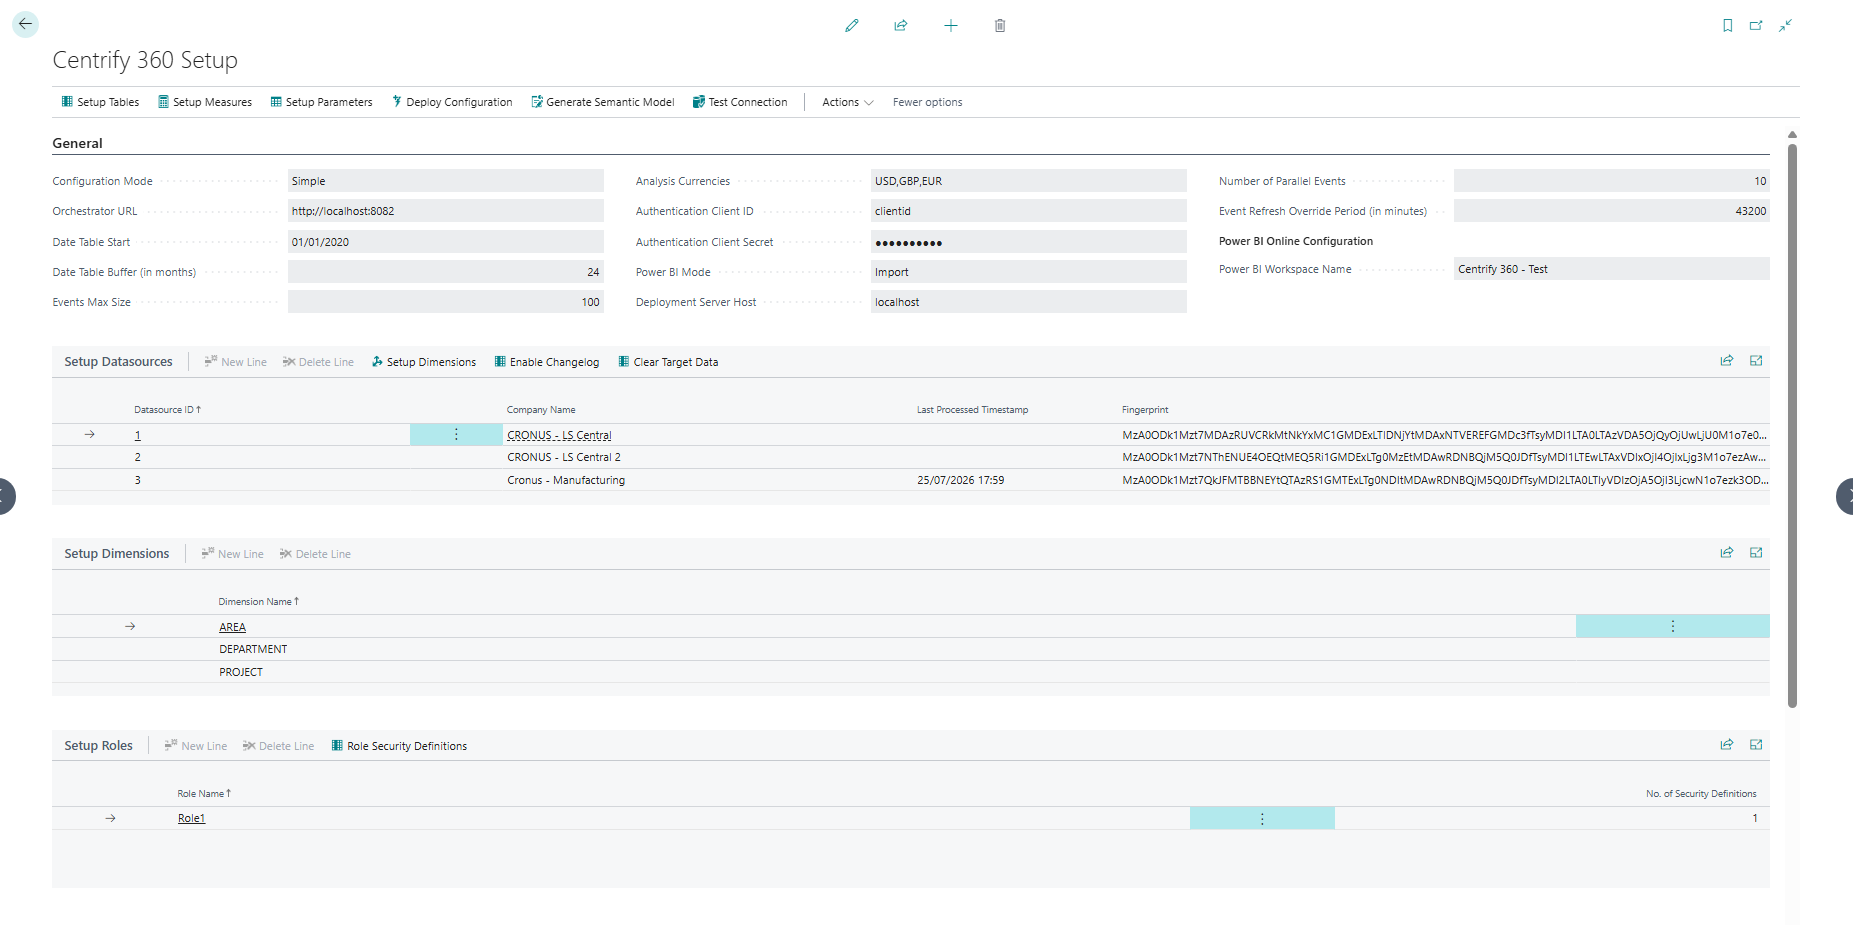
After completing the publish step, you should be able to see the following pages in Business Central for configuration:

4.2. Step 2: Fetch Companies' Fingerprints & Get a License
The software license is coupled to a Business Central company fingerprint.
The fingerprint should be extracted from all companies where BI is required.
To do so:
-
Navigate to Centrify 360 Setup page.
-
Fill Datasource ID and map it to the required company name.
-
Repeat this step for all companies that you would like to integrate with Centrify 360.
-
The fingerprints will be shown for each row as in the screenshot above.
Once we receive the fingerprints, a license.lic file will be provided to you for the rest of the steps.
4.3. Step 3: Deploy Centrify 360 Managed Application from Azure Marketplace
-
Sign in to the Azure portal with an account that has permission to deploy marketplace offers.
-
Open the Azure Marketplace and search for the Centrify 360 managed application (Centrify 360 ETL for Dynamics 365 Business Central).
-
Click Create (or Get it now) to start the deployment wizard.
-
In the Basics section, select:
-
Subscription: The subscription where Centrify 360 will be deployed.
-
Resource group: Create a new resource group or use an existing one dedicated to Centrify 360.
-
Region: Choose the Azure region that aligns with your data residency and latency requirements.
-
Deployment Name: A short lowercase prefix used to derive resource names.
-
-
In the Plan step:
-
Select the required Centrify 360 plan.
-
If you choose a Scheduled plan, also select the Sync Window Start Time (UTC).
-
Use the information boxes in the wizard to confirm whether the selected plan is Scheduled or Always On.
-
-
In the Deployment Configuration step, provide:
-
Administrator Username
-
Administrator Password
-
Database Name
-
Image Version Tag: supplied by the Centrify 360 team.
-
Enable Deploy AI Assistant only if you want the Centrify 360 AI assistant to be deployed. When AI is enabled, the Power BI app registration fields in the next step become mandatory. If enabled, provide:
-
OpenAI Endpoint URL
-
OpenAI API Key
-
OpenAI Deployment Name
-
-
Existing Orchestrator URL: Required only for the AI Only plan.
-
-
In the Application Secrets step, provide:
-
Centrify 360 License Key
-
Orchestrator Client ID
-
Orchestrator Client Secret
-
Power BI App Client ID
-
Power BI App Client Secret
-
Power BI Tenant ID
-
The Power BI fields are used as follows:
-
Mandatory when Deploy AI Assistant is enabled.
-
Required when you plan to use Integrated Publish & Update.
-
Optional when AI is disabled and you only plan to publish reports manually.
Azure will deploy the managed application, which provisions:
-
A dedicated PostgreSQL flexible server for analytics data.
-
The Centrify 360 ETL orchestrator running on Azure Container Apps.
-
The Centrify 360 AI assistant on Azure Container Apps when AI is enabled.
-
Azure storage and file shares for configuration and artifacts.
-
A Log Analytics workspace for monitoring and diagnostics.
Deployment can take several minutes to complete.
4.4. Step 4: Add the AI Redirect URI to the App Registration
If the AI assistant is enabled, you must add the AI callback URL as a redirect URI in the registered Power BI service principal. This is mandatory for Microsoft OAuth to work correctly.
-
In the Azure portal, open Microsoft Entra ID > App registrations.
-
Open the app registration used for the Power BI App Client ID.
-
Go to Authentication.
-
Under Platform configurations, add a Web redirect URI if one does not already exist.
-
Add the following redirect URI, replacing
AI URLwith the deployed AI endpoint: AI URL/auth/oauth/azure-ad/callback -
Save the changes.
For a managed SaaS deployment, use the aiContainerAppUrl deployment output as the AI URL value.
Example:
https://your-ai-endpoint/auth/oauth/azure-ad/callback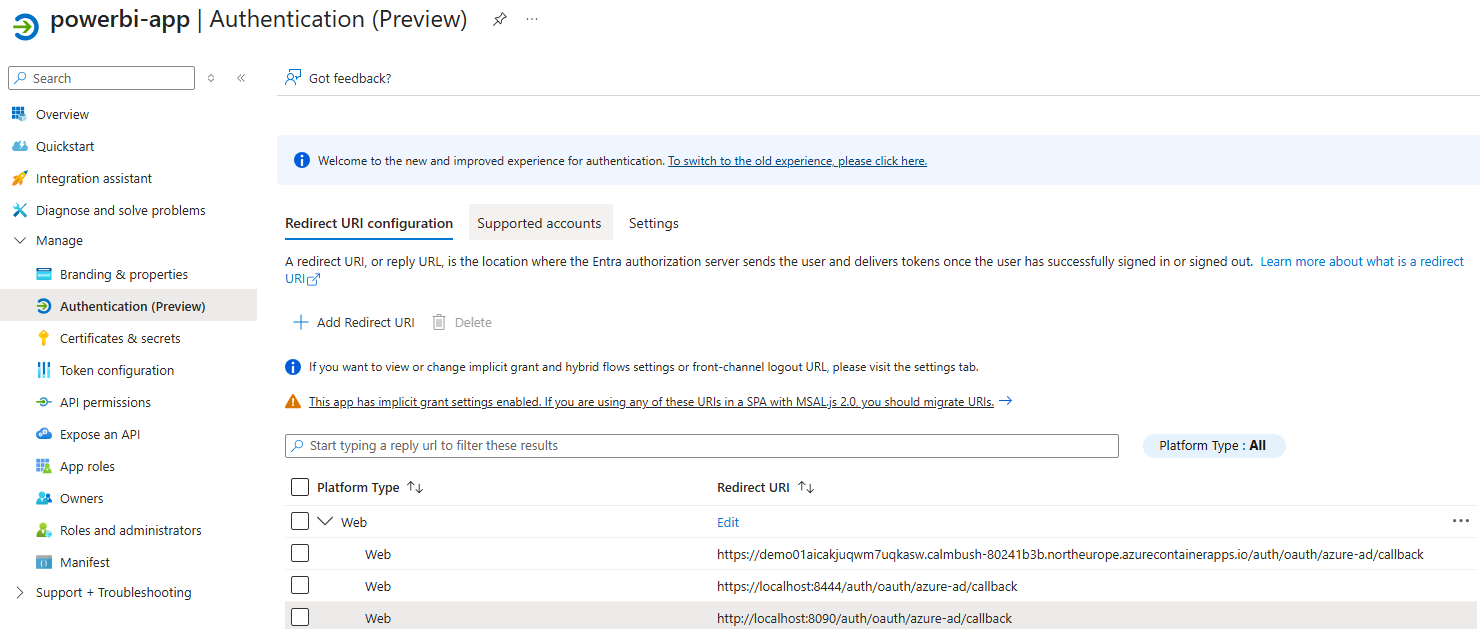
4.5. Step 5: Retrieve Orchestrator Endpoint and Connection Details
After the deployment completes successfully, Azure exposes several useful values as deployment outputs from the ARM template:
-
containerAppUrl: External URL of the ETL orchestrator container app (used as the endpoint in Business Central). -
aiContainerAppUrl: External URL of the AI assistant container app when AI is enabled. -
postgresServerFqdn: Fully qualified domain name (FQDN) of the PostgreSQL flexible server. -
postgresServerName: Name of the PostgreSQL server resource. -
storageAccountName: Name of the storage account used by Centrify 360. -
logAnalyticsWorkspaceName: Name of the Log Analytics workspace. -
containerAppsEnvName: Name of the Container Apps environment. -
containerAppName: Name of the orchestrator Container App instance. -
planDeployed: The Centrify 360 plan that was deployed. -
syncWindowMode: Indicates whether the database is scheduled or always-on. -
powerBiAppId: The Power BI App Client ID stored during deployment. -
aiEnabled: Indicates whether the AI assistant was deployed.
To view these outputs in the Azure portal:
-
In the Azure portal, navigate to the resource group where you deployed Centrify 360.
-
In the left-hand menu, select Deployments.
-
Open the most recent deployment for Centrify 360 (for example, the one created by the Marketplace wizard).
-
Select the Outputs tab. You should see the values listed above.
Make a note of at least:
-
Orchestrator URL: the value of
containerAppUrl. -
PostgreSQL server FQDN: the value of
postgresServerFqdn.
These values will be used when configuring the Business Central connector and Power BI.
5. Notes and Recommendations
-
Scaling and plan changes:
-
If you need more capacity (CPU, memory, storage), move to a higher Centrify 360 plan in Azure Marketplace, which will adjust the underlying resources according to the plan definition.
-
-
Security and network configuration:
-
By default, the managed application is deployed with secure defaults and public endpoints suitable for typical Business Central SaaS integrations.
-
For advanced network requirements (private endpoints, VPN, etc.), contact the Centrify 360 team for guidance.
-
-
Monitoring and troubleshooting:
-
Use the Azure portal to monitor the health of the Container App, PostgreSQL server, and Log Analytics workspace.
-
Review application logs and metrics to diagnose issues or performance bottlenecks.
-
6. Next Steps
Once the managed application is deployed:
-
Proceed to Basic Configuration to complete module-level setup and enable specific analytics scenarios (Sales, Purchases, Inventory, Finance, etc.).
If you encounter issues during deployment or configuration, please contact the Centrify 360 support team with your deployment name, Azure subscription ID, and any relevant error messages.